Connect to Microsoft Graph using Client Secret

This is most common method used to avoid interactive login & when you want to run an script in unattended mode. Let’s start by Registering an application in Azure.

Below are the steps to register an application in Azure AD:

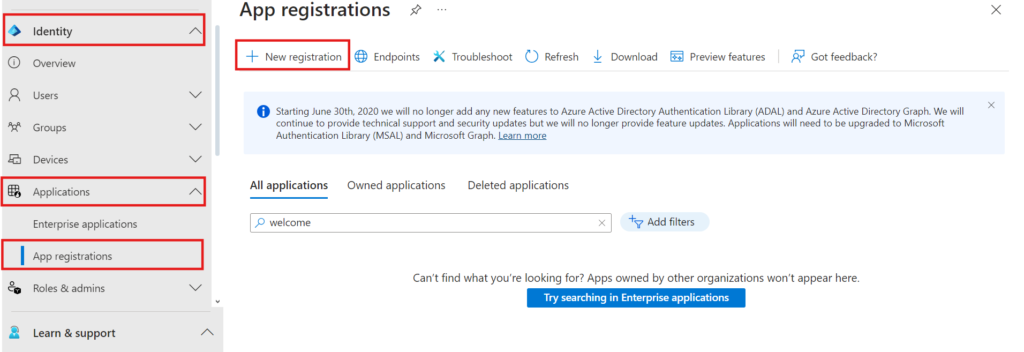
  • Sign in to Microsoft Entra admin center & expand Identity from left side blade panel.
  • Next Click on Applications > App registrations, then on New registration


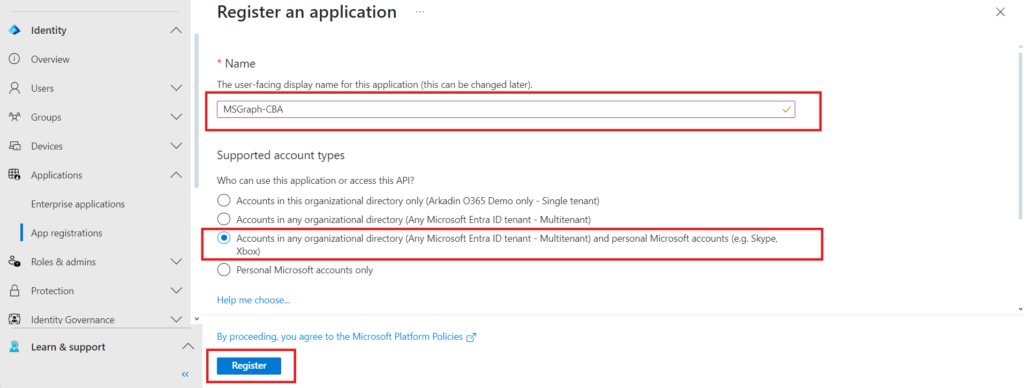
  • Type any name you want to give, you can chose any name which is relevant to the app.
  • We will use name MSGraph-CBA
  • Select Accounts in any organizational directory (Any Azure AD directory – Multitenant) and personal Microsoft accounts & Register
  • Next you will see application overview for MSGraph-CBA application.
  • Make note of the Application (client ID) and Directory (tenant) ID, we need them on later point of time.


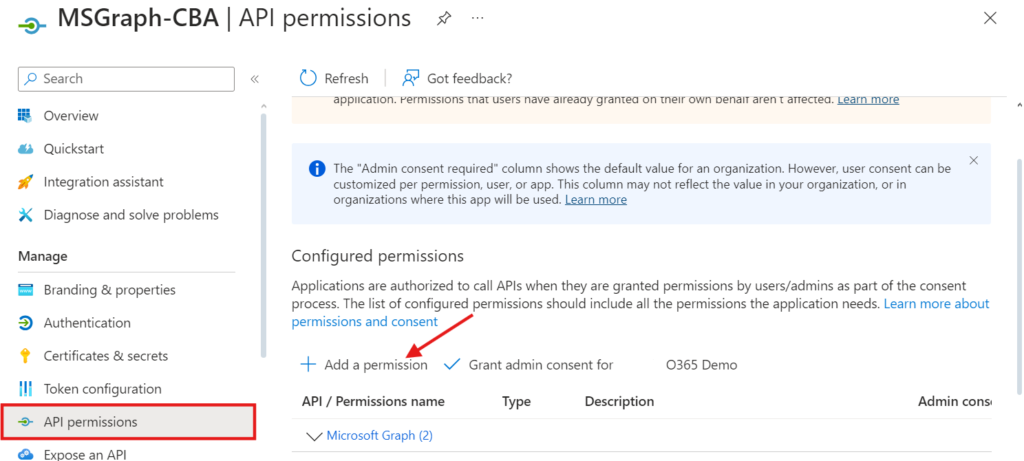
  • Configure Azure application API permissions, we need to add API permissions to the MSGraph-CBA application we have created, by following the below steps:
  • Click on API permissions > Add a permission


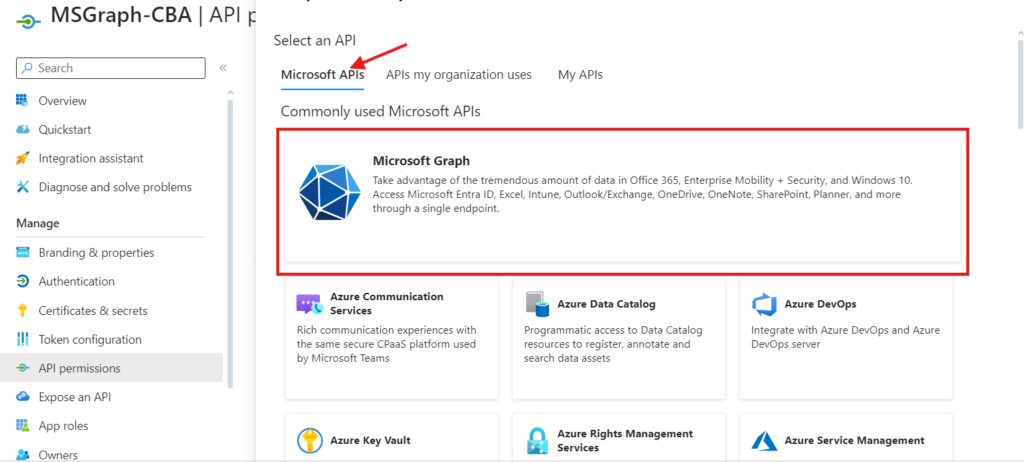
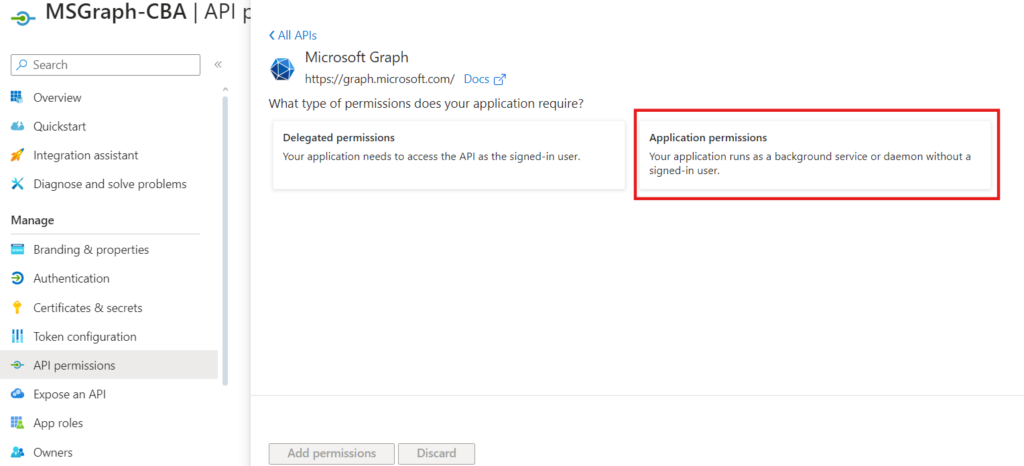
  • Select Microsoft APIs > Microsoft Graph


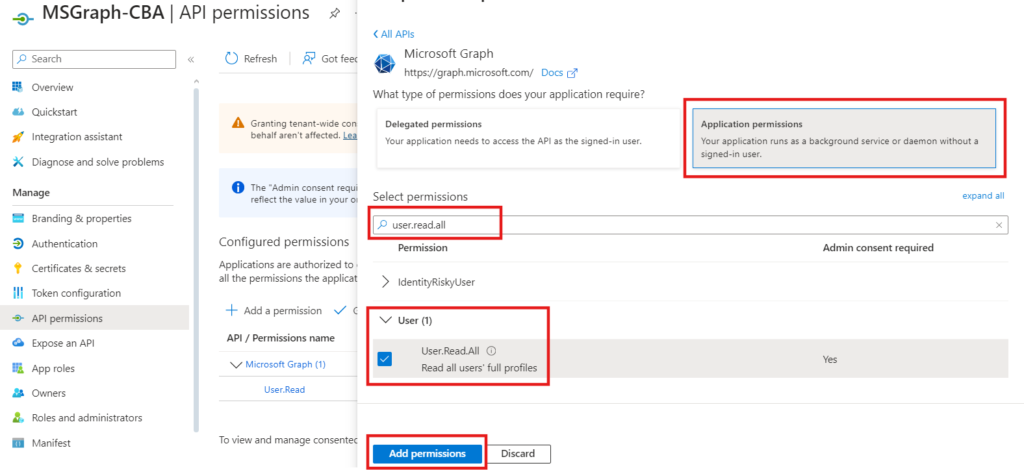
Select Application permissions

  • Search for user.read.all
  • Expand User and select User.Read.All
  • Click Add permissions
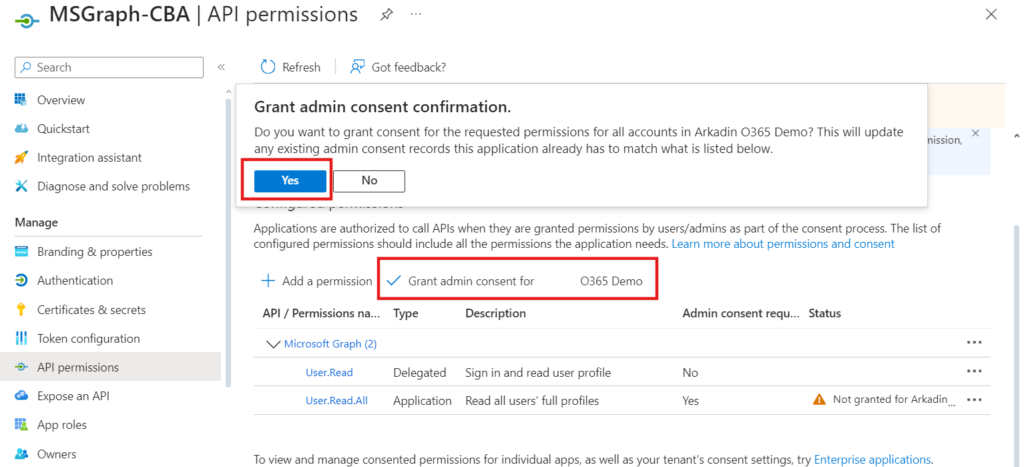
  • Click on Grant admin consent
  • Click Yes
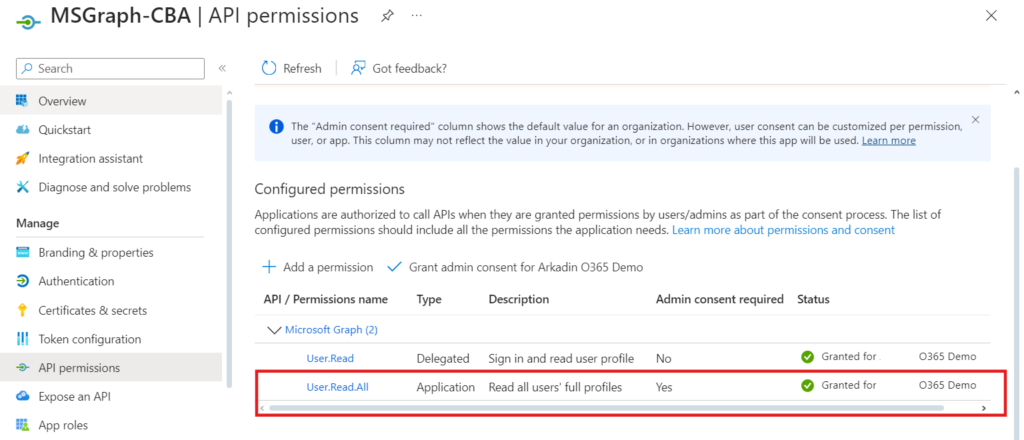
  • The status shows a green checkmark

Now that the application is registered and the API permissions are set, we can configure two methods for authentication; Certificate or Client Secret. But we will be focusing on Client Secret based method.

Client Secret !! Ok the last step, we need to add a Client Secret that the application uses to prove its identity when requesting a token from Entra ID.

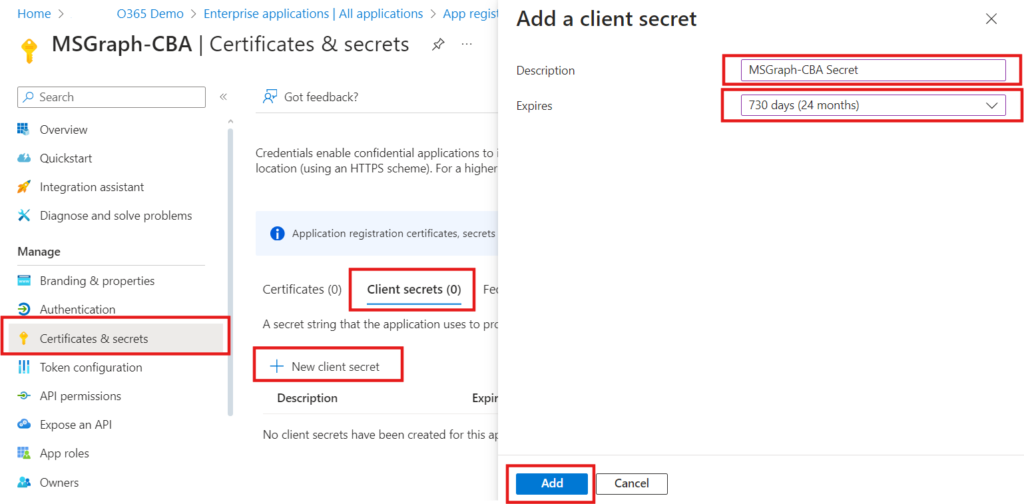
  1. Click on Certificates & secrets
  2. Click Client secrets > New client secret
  3. Give it the description MS Graph CBA Secret
  4. Select the expires date 730 days (24 months)
  5. Click Add
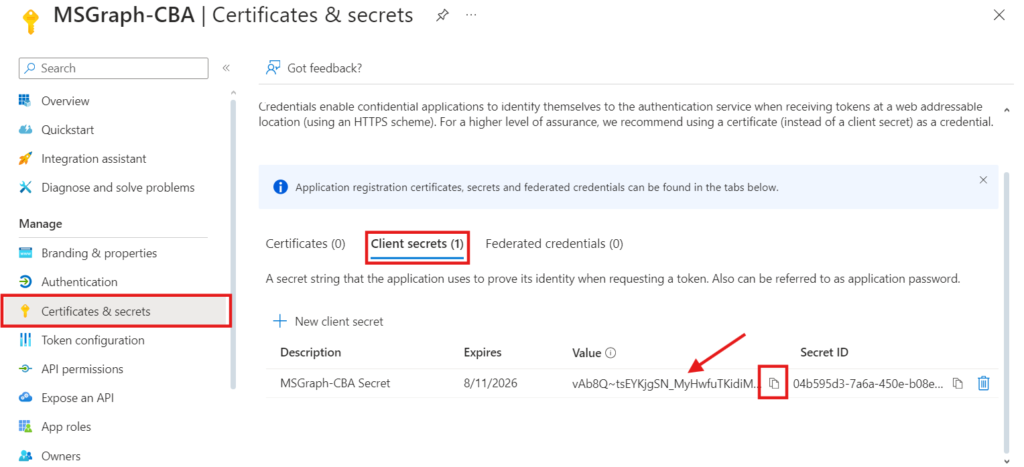
  1. Make note Client Secret Value we need it in the next step when connecting to Microsoft Graph

7. Connect to Microsoft Graph with Client Secret

Start Windows PowerShell and create below three variables to connect to Microsoft Graph PowerShell with Client Secret:

  1. $ClientId
  2. $TenantId
  3. $ClientSecret

# Configuration
$ClientId = "46d72c45-2bd9-4bfa-af71-7c77ef5a"
$TenantId = "ddecfe46-14ad-4d69-81b1-d8081230"
$ClientSecret = "vAb8Q~tsEYKjgSN_MyHwfuTKidiMk5hniuk87n"

# Convert the client secret to a secure string
$ClientSecretPass = ConvertTo-SecureString -String $ClientSecret -AsPlainText -Force

# Create a credential object using the client ID and secure string
$ClientSecretCredential = New-Object -TypeName System.Management.Automation.PSCredential -ArgumentList $ClientId, $ClientSecretPass

# Connect to Microsoft Graph with Client Secret
Connect-MgGraph -TenantId $tenantId -ClientSecretCredential $ClientSecretCredential

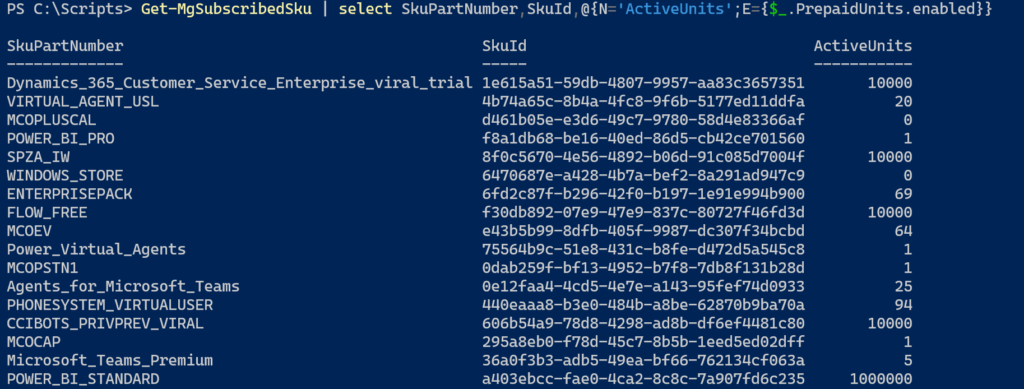
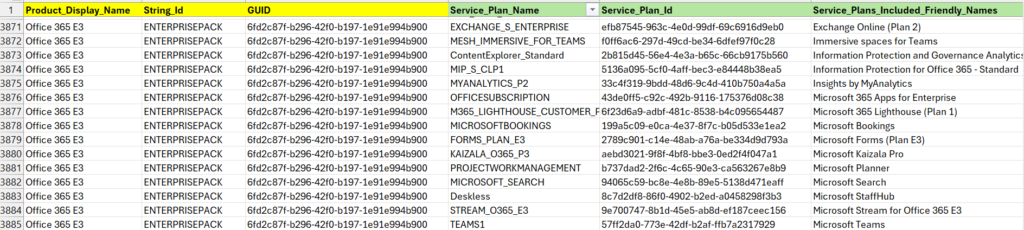
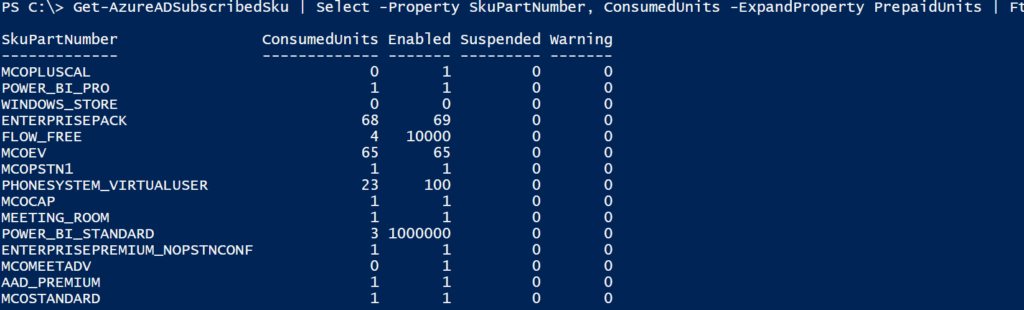
Now that you are connected to Microsoft Graph PowerShell, run the Get-MgUser cmdlet to get the list of users.

Get-MgUser

Great !! That’s all

Posted in MS Teams, Powershell | Leave a comment

M365 Licensing

In this post we will show you how to use Microsoft Graph PowerShell to view and manage Microsoft 365 Licenses. Let’s say you decided to start using M365 services.

  1. You created a new M365 Tenant & purchased required M365 product from Microsoft e.g. Microsoft 365 E3, Microsoft 365 E5 etc…
  2. Let’s verify all the purchased product by running below cmdlt.
Get-MgSubscribedSku | select SkuPartNumber,SkuId,@{N='ActiveUnits';E={$_.PrepaidUnits.enabled}}

output of above cmdlt will look like below.

3. Next lets assign license to the user. Make note of license SkuId from above list.

Set-MgUserLicense -UserId <UPN> -AddLicenses @{SkuId = <SKuId>} -RemoveLicenses @()

4. Next lets check how many license we have consumed from purchased quantity.

Get-MgSubscribedSku | select SkuPartNumber,SkuId,@{N='ActiveUnits';E={$_.PrepaidUnits.enabled}},ConsumedUnits

Output of above command will looks like as below.

Same Person Different Name !!!!!

Ok there is a bit of confusion when it comes to naming convention between Web-interface and PowerShell. It will be same product on both the places but different naming convention. Lets try to understand it with the help of example. You have purchased Office 365 E3.

GUI: Onto GUI you will see it as below, Product will show as Product name.

Let’s check the services included onto this product from entra.microsoft.com portal.

PowerShell: Onto PowerShell you will see it as below, Product will show as skupartnumber. Services will show as ServicePlans. If you see closely the service names in PowerShell differ from GUI e.g. in GUI Exchange online service name is Exchange Online (Plan 2) & in PowerShell it is Exchange_S_Enterprise

Below are the Microsoft links to download complete list of Microsoft products and their corresponding GUID in .csv format.

https://learn.microsoft.com/en-us/entra/identity/users/licensing-service-plan-reference

https://download.microsoft.com/download/e/3/e/e3e9faf2-f28b-490a-9ada-c6089a1fc5b0/Product%20names%20and%20service%20plan%20identifiers%20for%20licensing.csv

Below is the snippet from downloaded file. Yellow color reflect the product name and Green color column shows services include inside that product. One important observation onto the .csv file is string_id represent skupartnumber of PowerShell cmdlts output

You might come across scenario, where you want to assign the license but want to disable few of services inside the license e.g. in below cmdlts we are assigning a user with O365 E3, but disabling “Yammer Enterprise” and “Exchange Online”. Guid id for various licenses and servicceplans can be fetched from above .csv file. OR by running PowerShell cmdlts in your environment.

$Disabled_Service_Plan_id = @("7547a3fe-08ee-4ccb-b430-5077c5041653", "efb87545-963c-4e0d-99df-69c6916d9eb0”)
$Office365E3Sku_GUID = “6fd2c87f-b296-42f0-b197-1e91e994b900”
Set-MgUserLicense -UserId F.bautis@cloudmechanis.in -AddLicenses @{SkuId = $Office365E3Sku_GUID; DisabledPlans = $Disabled_Service_Plan_id} -RemoveLicenses @()


Posted in MS Teams | Leave a comment

VS Code Autocomplete for Azure Terraform

Azure Terraform extension for vscode will allow autocomplete. But in case we want the resource to be pouplated with required attributes then we need to add below line of code onto settings.json file.

  1. Open Visual Studio Code.
  2. Then open settings.json file using the command Palette.
  3. Press Ctrl+Shift+P
  4. Select/Type Preferences: Open User settings (JSON)
  5. Make the necessary changes by adding below line of code onto settings.json
    “terraform.experimentalFeatures.prefillRequiredFields”: true,
  6. It will look something like below
  1. Save and close the file.
  2. Re-load VSCode and try writing a small terraform code. You will see it will autopopulate the required attribute for that particular resource e.g location & name in case of new resource group as below.
Posted in Azure | Leave a comment

Azure AD Roles vs Azure RBAC Roles

Inside Microsoft Azure environment, we see two kind of permission granting mechanism – Azure roles and Azure AD roles. They play their own role as per your requirement as M365 administrator OR as as a Azure Tenant Administrator. We will try to see few key differences between both onto the below table.

Azure AD RolesAzure RBAC Roles
Azure Active Directory has its own, unique set of roles, specific to identity management.Azure RBAC roles are used to control permissions for managing Azure resources, while Azure AD administrator roles control permissions to manage Azure Active Directory resources
Azure AD Administrator roles are used to manage Azure AD resources in a directory.RBAC roles are used to manage access to Azure resources like VMs and storage accounts.
Global Administrator is the highest level permission that also assigns admin roles to other users, and resets passwords for users and all other administrators. Here are the major roles.
Global administrator – the highest level of access, including the ability to grant administrator access to other users and to reset other administrator’s passwords.
User administrator – can create and manage users and groups, and can reset passwords for users, Helpdesk administrators and User administrators.
Helpdesk administrator – can change the password for users who don’t have an administrator role and they can invalidate refresh tokens, which forces users to sign back in again.
Billing Administrator – can make purchases and manage subscriptions.
 
Azure RBAC roles can be specified at multiple levels, including management groups, subscriptions, resource groups, and even resources. Here major roles include
Owner – Full rights to change the resource and to change the access control to grant permissions to other users.
Contributor – Full rights to change the resource, but not able to change the access control.
Reader – Read-only access to the resource
User Access Administrator – No access to the resource except the ability to change the access control.
Azure roles and Azure AD roles assigned to various Azure Component
Generic Hierarchy for applying Azure RBAC roles
Posted in Azure | Leave a comment

Azure Identity Objects aka Security Principal’s

A security principal represents a user, group, or service principal that can be used to assign permission on various Azure Resources.

Users (User Principal): These are basically our normal users with UPN and password. We create a user object in Azure AD, and use it to authenticate to access various services e.g. M365 etc.…
Groups: These are another type of object in Azure AD mainly known as security group in Azure AD, and they can be used to specify permissions to SharePoint sites etc.…
Enterprise Apps (Service Principal): Ok so these are the interesting one, here we give permissions based on Application ID. You might have seen Enterprise application in your Azure AD. When these application are accessing some resource in your tenant. That means they are leveraging Service principals.

Managed Identities: These are the latest introduction onto the identity model. In fact, we can say they are actually Service Principals. They are always linked to an Azure Resource.

Managed Identities are further of Two Types:

System assigned: in this scenario, the identity is linked to a single Azure Resource, eg a Virtual Machine, a Logic App, a Storage Account, Web App, Function,… so almost anything. Next, they also “live” with the Azure Resource, which means they get deleted when the Azure Resource gets deleted. –
User Assigned Managed Identity: These are meant to create as a stand-alone Azure resource by itself, after which it can be linked to multiple Azure Resources.

Posted in Azure | Leave a comment

Azure Terraform Module

A Terraform module is a container for creating azure resources with modular approach. Every Terraform configuration has at least a root module & it consists of the resources defined in the terraform .tf files in the main working directory.

Posted in Azure | Leave a comment

Demystifying Teams Call flow using Wireshark

In this post we will try to analyze Teams call flow using Wireshark tool. For this demonstration we will take 2 users (User1 & User2). User1 will try to establish call with User2 and based on their location (direct connection, behind NAT Or behind Symmetric NAT etc…) we will see & try to analyze the traffic flow. User1 will make a call to User2 and below set of action will happen for complete P2P call establishment.

User1 will approach O365 Teams/STUN server to get the list of ICE candidate. User1 Teams will send below STUN request on UDP port 3478.

User1 to STUN server request

STUN server will respond back to User1 with server reflexive IP. In our case, STUN server had received the request from User1 PC with IP address as (169.149.227.137:50002). Next in a Success response, STUN server will respond back to User1 with srflx IP address aka XOR-MAPPED-ADDRESS. In below screenshot we can see the reflexive IP as XOR-MAPPED-ADDRESS.

STUN response to User1

Once User1 PC received Success response from STUN server. It will draft Offer for User2. This is basically a SDP offer from User1 to User2. In this offer User1 will encapsulate the list of all ICE candidate and send it across to user2. Below is the list of ICE candidate onto the SDP offer from User1.

ICE Candidate List

host: This is User PC private address both IPv4/IPv6 e.g. 192. OR 10. series.
srflx: This is User1 public IP address to reach him directly for P2P connection.
relay: In case User1 is not reachable directly via srflx IP. Then he can be reached via relay

Once User2 received the SDP offer from User1, it will come to know that User1 is reachable at (169.149.227.137:50002). User2 will follow same process just like User1 and share his details (20.169.147.150:50006) with User1. Once both the users knows other endpoints IP Address:port RTP communication will start.

Last we checked the RTP stream and we were able to see User1 & User2 are communicating directly to each other on shared reflexive IP addresses they obtained from STUN server.

User1 RTP Stream
User2 PC RTP Stream

Very important to note, in this case users were able to communicate directly with each other over 50000 port numbers using srflx IP addresses because they are in less restricted NAT environment on both the side. Next we will discuss the call flow when Teams users can’t establish direct connection Or Symmetric NAT is in place and they make use of Transport Relay Or TURN servers.

Note: Onto RTP stream we are seeing 192.168 & 10.0 series IP address. These are the actual IP address of these PC and Wireshark capture is running on these NIC cards. So we are seeing these Private addresses.


Posted in MS Teams | 1 Comment

SDP

SDP (Session Description Protocol) is as good as saying like how I am reachable & what all we can use to communicate with each other. To compare it with real life analogy, let’s say someone want to reach us. We will share our contact information such as email, phone number, facebook id, home address, etc.. Additionally we will also let them know that when you reach out to us please note I/we can only talk in English. It’s like sharing your business card with someone.

Following above analogy when we want to establish a VOIP call. We also need to have a digital business card that holds the contact information of caller and calle. This will contain info such as

  • Caller and callee IP addresses
  • Media types do both peer support (Audio, video, screen share, etc.)
  • Which codec types both peer supports

In the telecommunication world, we called this digital business card Session Description Protocol (SDP). SDP contains the required information to peers talk to each other.

Below is a two sample SDP snippet with few fields along with their values.

Below is the Description of the fields we will see in SDP offer:

Field NameDescription
v=Protocol version
o=Originator (username, session ID, version number)
s=Session name
i=Session information (more descriptive information)
u=URI of the session
e=Email address of the session originator
p=Phone number of the session originator
c=Connection information (network addresses and ports)
b=Bandwidth information (for media streams)
t=Session timing (start and stop times)
r=Repeat times for a session
z=Time zone adjustment for a session
k=Encryption key information
a=Session attribute (further information about the session)
m=Media description (type, port number, transport protocol, and format)
i=*Media title (for media streams)
a=rtpmap:RTP payload type mapping
a=rtcp:RTCP port information
a=ptime:Packet time interval for audio
a=maxptime:Maximum packet time interval for audio
a=sendrecvMedia direction (send and receive)
a=sendonlyMedia direction (send only)
a=recvonlyMedia direction (receive only)
a=inactiveMedia direction (inactive)
a=ssrc synchronization source (SSRC) identifier for a particular RTP stream.
a=ssrc-group:Grouping of synchronization source identifiers
a=mid:Identification tag for a media source
a=msid:Identification tag for a “media stream” within a “media source”
a=ssrc-msid:Association of a synchronization source identifier with a “media stream” within a “media source”
a=ice-ufrag:ICE username fragment
a=ice-pwd:ICE password
a=ice-options:ICE options
a=fingerprint:Transport layer security fingerprint (for SRTP)
a=candidate:ICE candidate (network address and port)
a=end-of-candidatesIndicates the end of ICE candidates
a=setup:Offer/Answer negotiation (who will initiate the connection)
a=connection-info:Connection information for a DTLS connection
a=rtcp-mux:RTCP multiplexing
a=rtcp-rsize:RTCP reduced size
a=rtcp-fb:RTCP feedback message
a=rtpport:Preferred RTP port
a=rtcpport:Preferred RTCP port
a=rtcp-mux-onlyRTCP multiplexing (no separate RTCP port)
a=rtcp-rsizeRTCP reduced size
a=content:Identification of the content type
a=label:Media stream label
a=msid-semantic:Semantics of the media stream identification
a=ssrc-semantic:Semantics of the synchronization source identification
a=rid:Identification tag for a temporal layer in a simulcast or scalable video stream
a=simulcast-03:Simulcast configuration using Simulcast 0.3
a=framerate:Frame rate of the video stream
a=imageattr:Image attributes for the video stream
a=content-type:Content type of the media stream
a=charset:Character encoding for text in the media stream
a=lang:Language of the media stream
a=extmap:Signaling of RTP header extensions
a=encrypt:Media encryption
a=crypto:Obsolete media encryption
a=setup:Indicates which peer should initiate the connection
a=source-filter:Filter RTP streams based on source IP address and port
a=ssrc-group:Grouping of synchronization sources
a=sctpmap:Mapping of SCTP parameters to DTLS parameters
a=max-message-size:Maximum message size for SCTP
a=sctp-port:Port number for SCTP
a=x-google-flag:Google-specific flags
a=x-google-start-bitrate:Starting bitrate for the video stream
Posted in MS Teams | Leave a comment

M365 Teams Calling Components for Direct Routing

Call Controller (CC)– This component take care of various call related operation in O365, this includes Reverse number lookup, call progress, routing calls to/from PSTN.  Sends a roster of connected callers & if required then ring multiple endpoints.  Coordinates Call Me at scenarios from Teams clients.
SIP Proxy (SP) is the bridge which  translates HTTP REST signaling to SIP. This will generally happen when a call need to go out from Teams towards SBC using Direct Routing. Before an incoming or outbound call can be processed, OPTIONS messages are exchanged between SIP Proxy and the SBC. These OPTIONS messages allow SIP Proxy to provide the allowed capabilities to SBC. It is important for OPTIONS negotiation to be successful (200OK response), allowing for further communication between SBC and SIP Proxy for establishing calls
Transport Relay (TR) – Provides media relay services to clients that cannot connect directly to SBC.
Media Controller (MC) is a microservice in Azure that assigns Media Processors and creates Session Description Protocol (SDP) offers.
Media Processor (MP) is B2BUA, which means it can change a codecs (for example, SILK from Teams client to MP and G.711 between MP and SBC), also it is a public facing component that handles media in non-bypass cases and handles media for voice applications, its instance is existing in main data centers only.

A sample call flow:

  1. Teams user called a PSTN number with Direct Routing Configuration in place.
  2. An Http Rest API signal will be sent from Teams client to O365 Team infra.
  3. Call will be sent to Call Controller component of Teams infra.
  4. Call Controller will check the assigned Voice Routing policy. And identify the corresponding PSTN usage.
  5. Once SBC identified, SIP proxy will convert HTTP Rest to SIP request & route it to SBC.
  6. Once SBC responded back with 200 OK status and session is established. Then media will start flowing over a secured channel with real time protocol SRTP.

Posted in MS Teams | 1 Comment

VoIP & MS Teams

VoIP is a way of transferring audio and even video information all-across the Internet. But sending this type of real time data over the internet isn’t as simple as attaching a file to your email or sharing it via OneDrive etc… And all of this made possible via VoIP.

A VoIP call is made up of two parts

1.) Signaling: Signaling is the first part of the call. Every VoIP call start with Signaling. In case of MS Teams Signaling messages are based on HTTP Rest API. When user dials out a number, it will initiate HTTP Rest API signaling message. SIP is another widely used text-based signaling protocol. When a teams user dial PSTN number and it need to go via Direct-Routing/Operator connect, once call leave Teams phone system towards SBC, it will be SIP signaling protocol. Microsoft with Teams Direct Routing setup will receive SIP signal from SBC via TLS encryption. Other known signaling protocol are H.323 & Media gateway control protocol (MGCP).

2.) Media: Once signaling is responded and call is established then real time Audio and Video traffic will be taken care by RTP protocol. In case of MS teams it will be SRTP (Secured Real Time Protocol).

Posted in MS Teams | 1 Comment

Azure Resource group using Terraform

Any resource we create in Azure need to be part of Resource group. So we will write-up a very basic code to create a Azure Resource group. Below is our sample code to create the resource group “Demo-RG” in “eastus” location.

terraform {
required_providers {
azurerm = {
source = "hashicorp/azurerm"
version = "~> 3.0.2"
}
}
required_version = ">= 1.1.0"
}
provider "azurerm" {
features {}
}

resource "azurerm_resource_group" "DemoRG" {
name = "Demo-RG"
location = "eastus"
}

Next save the above text onto a .tf file e.g. main.tf . Browse to terminal and login to your Azure tenant using cmdlts az login.

Once logged in then run below cmdlts

Terraform.exe init
Terraform.exe plan
Terraform.exe apply

Once all completed login to your azure tenant and you should be able to see resource group Demo-RG created

Posted in Azure | Leave a comment

MS Teams Direct Routing call flow with LBR config

In a previous blog post we walked through the steps to configure Microsoft Teams environment for Location Based routing for PSTN calling. In this blog post, we will try to understand the call flow in LBR Setup. Below flow-chart depict the call flow for LBR based configuration scenario.

Click on the image to view it full-size
Posted in MS Teams | Leave a comment

AudioCodes SBC config for MS Teams Direct Routing

Direct routing is a feature where you can bring your own telecom carrier for making PSTN call from Teams client. Logically most of the certified SBC follow same logic. But the option & terminology is slightly different. Audiocodes SBC are certified by MS for Direct Routing.

Now we will configure various component of SBC for direct routing.

  • Ethernet Devices lets us configure the ethernet devices and corresponding VLAN onto the SBC. The devices will be used to assign the IP address onto the next steps. We will configure VLAN by adding Ethernet devices from Setup menu > IP Network tab > Core Entities folder > Ethernet Devices.
  • IP Interfaces lets us assign the actual IP addresses for management and other connectivity such as Media and control. This can be set from setup menu > IP Network tab > Core Entities folder > IP Interfaces
  • TLS Contexts to ensure the TLS connectivity from SBC to other devices/component. This will be achieved by creating a certificate request and importing certificate to the SBC. The Microsoft Phone System Direct Routing Interface allows only TLS connections from SBCs for SIP traffic with a certificate signed by one of the Trusted Certification Authorities. Setup menu > IP Network tab > Security folder > TLS Contexts
  • Media Realm allow dividing the UDP port ranges for use on different interfaces.
  • SIP Interfaces will configured to handle SIP signaling request. Open the SIP Interfaces table from Setup menu > Signaling & Media tab > Core Entities folder > SIP Interfaces. SIP interface is basically set to accept Signaling request To & From remote party.
  • DNS settings allow proper name resolution of various FQDN. Setup > IP Network > DNS
  • Proxy Sets is basically the addresses where SBC will communicate Or route the traffic e.g. sip.pstnhub.microsoft.com for Teams. As a part of security measure sbc should be receiving calls originating from the endpoints defined in Proxy sets. Configure Proxy sets & proxy set tables from Setup menu > Signaling & Media tab > Core Entities folder Proxy Sets
SBC connectivity logic (Image Courtesy: Audiocodes)
  • Media security under setup > Signaling & Media > Media > Media Security.
  • Coder Group configuration with allowed codecs and map it properly to IP-Profile Under setting Extension Coders Group.
  • Configure IP Profile for Teams and PSTN.
  • Configure the IP Group.
  • IP-to-IP Routing to route the call between 2 networks. From PSTN to Teams and another Route from Teams to PSTN network.
  • SRTP at SBC level to secure the RTP traffic.
  • Below diagram depict a top level flow to configure SBC components. Every block will be used as input onto the next block as per arrow direction.

Posted in MS Teams | Leave a comment

Call routing decision when Direct Routing/ Operator Connect/ MS calling plan co-exist

Often we come across scenario where we have direct routing setup for few users, additionally we have also bought few number with MS calling plans. Now we also have another option of operator connect to buy calling plans from MS operator partners. Once all 3 co-exist then how the calls will get routed. Below flow-chart depict the flow as per user number assignment.

Posted in MS Teams | Leave a comment

Use “Enter” key to copy data in Windows Terminal

While working at PowerShell , we have the option of copying text by selecting it and pressing Enter key. Later, we can paste the text whenever required by right-clicking anywhere inside the window. Unfortunately Windows Terminal does not allow us to work in a similar manner. When you select any text inside Windows Terminal and press Enter key to copy it, it simply jumps to a new command (carriage return) without actually saving the text to the clipboard. And there is no setting to make it work. So alternate way to make this work is by opening settings.json file for Windows Terminal. File is located in below location.

%LOCALAPPDATA%\Packages\Microsoft.WindowsTerminal_8wekyb3d8bbwe\LocalState\settings.json

Locate below text block in this file and copy it and paste it on the same file.

Once pasted then edit copied text and replace “Keys”: “crtl+c” with “keys”: “enter”. Save the file and restart windows terminal and now you will be able to copy the text by selecting and hitting enter.

Posted in Powershell | Leave a comment

Voice Protocols & Codec

Signaling

Description: These protocols are responsible for the establishment, preservation and tearing down of call sessions. They are also responsible for the negotiation of session parameters such as codecs, tones, bandwidth capabilities, etc.
Media

Description: A protocol is designed to handle real-time traffic (like audio and video) of the Internet. These protocol are designed to carry streaming audio and video. VoIP protocols such as RTP rely upon session and signaling protocols including SIP, a signaling protocol and H.323
Codec

Description: A codec is a computer program that encodes and decodes audio. As an encoder, it prepares a data stream, such as a collection of voice packets, for transmission over a computer network. The same codec that encodes the audio is used on the receiving end to help organize the data stream into a mode that humans can understand, such as audio played through a set of headphones
SIPRTP/SRTP/RTCP: Encoded packets of audio data are carried by the real-time transport protocol (RTP)SILK is designed by Skype as an internet wideband audio codec for use in VoIP.
HTTPS/REST-APIvideo conferences are accomplished over the MNP24 protocolAudio Codec:  G.711G.723G.726G.729GSMQCELPMP3, and DTMF
H.323Video Codec:  H.261H.263H.264H.265 and MPEG-1/MPEG-2
Posted in MS Teams | Leave a comment

E911 Call flow in Microsoft Teams

Very often we come across scenario where we need to configure E911 for Teams. Especially in US, after introduction of two laws (Ray/Baum act & Kari law). It is very important to understand the E911 call flow for its proper working functionality. Below flow chart will give insight on E911 call flow and where your call might be failing to reach out E911 service.

Posted in MS Teams | Leave a comment

Porting a MS calling Plan user number to Direct Routing

One among the interesting scenario is port-out number from MS calling to Direct routing. Scenario will be where currently you are using MS calling plan. You have purchased Domestic and International calling plan from Microsoft. So today your users are making outbound call with MS assigned number.

Below are the steps you need to carry out to perform this migration.

  • Un-assign Calling Plan Phone Number from user Config.
    Remove-CsPhoneNumberAssignment  -Identity user@cloudmechnics.in -PhoneNumber +1456877778-PhoneNumberType CallingPlan

  • Take away Calling Plan License from user license list. Make sure you are taking only Calling plan license. You don’t need to remove Phone System license from user.
  • Give it a while say around 1 hour.
  • Next give heads up to your new carrier to start porting the number from Microsoft to your new carrier.
  • Porting will start and it may take few hours to acquire the numbers by new carrier.
  • As we are porting the existing number from MS Calling to Direct Routing, once numbers are ported to new carrier, these number should disappear from your Teams admin portal.
  • In case you are trying to assign the number before its taken away by MS, then you will get error message as ” Telephone number +545677899 is not a Direct Routing number”. Below is the error screenshot in case you try to assign same number as Direct Routing number before its ported to new carrier & existing number released by Microsoft.
  • Next get into Teams PowerShell and set-csphonenumberassignment the OnPremLineURI attribute to the Direct Routing DDI and make sure the EnterpriseVoiceEnabled attribute is set to $true
  • Assign Online Voice Routing Policy .
  • Assign the calling policy and Dial Plan to the users.

Note: Microsoft Validate Port-Out request with a PIN. This is 10-digit PIN and it will be generated from your Teams admin portal. Login to Teams admin portal, browse to phone numbers, locate action on the top right corner, Click on Manage porting PIN. Generate PIN from here & share it with MS while porting the numbers. This will be validated by Microsoft when port-out start.

Posted in MS Teams | Leave a comment

SIP Protocol

SIP (Session Initiation Protocol) is the protocol used for signaling in VOIP communication. When 2 sip User agent want to communicate with each other, first they need to initiate the session. SIP is the protocol which will help in establishing that connection. Similarly when these 2 User agents want to close the connection, they will use SIP. Don’t get confused SIP with RTP. RTP is protocol used to transfer the media between two agents. In below diagram green color Sine wave represent media and being carried out by RTP protocol. Rest all the blue and Red arrow represent SIP & respective signaling code.

Posted in MS Teams | 1 Comment

Microsoft Teams Common Area Phone

Organization are migrating from legacy phone system to Microsoft Teams by adopting Teams Phone System as a replacement for their traditional PBX systems. There are general scenario where organizations are having common area phones such as at reception. In these phone, users don’t need to login with their ids and they just walk into these phones and dial in number and make calls. Within Teams, Common Area Phones can be set up to provide this functionality without requiring a user to login.

Prerequisites

Sufficient Common Area Phone Licenses for all common phones.

Phone numbers and Routing available to assign through Calling Plans/Operator connect/Direct Routing to make outbound calls.

Configuration steps:

  • Provision a user account and assign the CAP license to this user.
  • Create an IP Phone Policy & assign it to newly created user.
  • Configure the Teams account for the CAP and assign a Phone number
  • Provision the common area phone.
  • Boot up the phone. It will ask to enter Admin cred.
  • This Admin cred will be used to access the phone via web.
  • Next It will give option to configure phone for Skypee for business/Teams/Others.
  • Select MS Teams. There are two ways to log in:
  • Entering the credentials on the device manually
  • Via Microsoft’s web sign in (clicking on the login page on “sign in from another device” and following the instructions). This is the preferred method for end users.

There are 3 different user profiles. This means they are assigned to the user, and when this user is logged on to any Teams device, it will be applied.

There are three available modes at this time:

  • User profile. Standard profile (Hotdesking can be enabled)
  • CAP. Common area phone. Hotdesking enabled (can be disabled). Phones for common areas that allow other users to log in for a pre-defined period of time, after which the phone reverts to the original base user.
  • Meeting rooms. Accounts designed for meeting rooms. Sign out is disabled. (it can be accessed knowing the device admin password)

Configuration Profiles (Device based profiles)

They consist of three groups of settings that can be applied to any device (or group of devices) to have some common settings.

General:

In here you will find the device lock preferences and settings. We don’t recommend setting a profile wide device lock as it loses its purpose, unless it is for common area devices or meeting rooms with restricted access. Regional time settings are also configured on this section. A possible general setup would be one profile per time zone and/or language. Device lock length and enablement is managed via PowerShell.

Device settings:

In here you will find idle and timeout settings like the screensaver and power saving features.

Network settings:

In here you will find many features that aren’t extremely useful (all the local network settings, just leave them as default), but some useful features like enable logging, enable or disable the PC network port on the phone, or the possibility to change the devices admin password (this one should always be changed).

Posted in MS Teams | 2 Comments

Media bypass in Microsoft Teams

Microsoft Teams leverage Media Bypass benefit with Direct Routing configuration. This is basically to shorten the path between Teams client and SBC/PSTN gateway. Normally, voice traffic or media traffic will travel from the Teams client to Media Relay servers in Microsoft Azure and from there routed over the Microsoft Teams backbone out to PSTNHUB (Microsoft Teams Direct Routing Head-Ends) and back down to the SBC.

When SBC/PSTN gateway & client making the call are in same local office. Media traffic can remain local but it will take complex path from local LAN to the cloud and back on-prem. Media Bypass solves this route problem & Media traffic goes straight from the Teams client to the SBC for media traffic. But signaling still remain via M365 Cloud.

Posted in MS Teams | Leave a comment

Dial Plan in Microsoft Teams

Dial Plan are set of rules which translate the phone number dialed by user to E.164 format. E.164 is the international telephone numbering plan that ensures each device on the PSTN has globally unique number. This number allows phone calls and text messages can be correctly routed to individual phones in different countries. E.164 numbers are formatted [+] (country code) (subscriber number including area code] and can have a maximum of fifteen digits.

Microsoft Teams dial plans are categorized into 2 types:

  • Service-scoped
  • Tenant-scoped 

Each user will be mapped with default Global (Org Wide) dial plan. Each user is automatically assigned the service country dial plan that matches the usage location assigned to the user. Service country dial plans are being managed by Microsoft and Teams admin cant make any changes onto these dial plans. User dialed a number it will checked against any custom Tenant-scoped dial plan. If there is nothing defined manually then it will fallback onto Service-Country dial plan associated with Usage location. So it’s not mandatory to define all normalization rules in tenant dial plans as they might already exist in the service country dial plan.

Now let’s try to understand it by an example:

User in France tried to dial Emergency number 112 from Teams client. User was checked against assigned Dial plan. In our case user is assigned with Global (Org wide) dial plan and no normalization rules are defined inside this dial plan. So next it will go for service-scoped dial plan which is inbuilt as a part of Microsoft country specific dial plan . And call will get routed to nearby PSAP services based on user Emergency address location specified during number assignment to the user.

Posted in MS Teams | Leave a comment

Location Based Routing in Microsoft Teams

Sometime we come across a scenario where we need to ensure that calls going outside the country/region need to go out through local carrier PSTN gateway. This is basically to meet the telecom regulation of that country/region. While leveraging teams for PSTN calling, we need to collect below information to configure LBR properly.

  • The Region
  • The Site inside the Region
  • Network Subnet at each site
  • Trust external internet IP address for each site
  • The SBCs for each site
  • List of the users in the LBR site
  • PSTN Usage container for our Voice routes.
  • Voice Routes to route the calls onto the next hop.
  • Voice Routing Policies for end users assignment.

OK let’s try to configure LBR for a organization based out India (Pune). India is one among the highly regulated country for LBR. A user is trying to make PSTN call from Pune to Spain. Teams will make initial signaling call to M365 Teams infra. User will be checked against his site/subnet location & if the site/subnet is configured for LBR. It will check for user assigned with calling policy preventtollbypass set to true. Next it will check for the local SBC/PSTN gateway configured for LBR. Then user call will be routed as per the user assigned Voice Routing Policy.

Below are the configuration steps:

Setup Trusted IP address:
New-CsTenantTrustedIPAddress -IPAddress 50.10.10.200 -MaskBits 30 

Network region:
New-CsTenantNetworkRegion -NetworkRegionID "India"

Network Site to the region:
New-CsTenantNetworkSite -NetworkSiteID "Pune" -NetworkRegionID "India" 
-EnableLocationBasedRouting $true

Network Subnet to the Site:
New-CsTenantNetworkSubnet -SubnetID "172.10.0.0" -MaskBits "24" -NetworkSiteID "Pune"

Create/Enable SBC-PSTN Gateway to LBR enabled
New-CsOnlinePSTNGateway -Fqdn sbc.cloud.com -Enabled $true -SipSignalingPort 5067 -GatewaySiteLbrEnabled $true -GatewaySiteID "Pune" -MediaBypass $true  -ForwardCallHistory $True -ForwardPai $True

Set-CsOnlinePSTNGateway sbc.contoso.com -BypassMode OnlyForLocalUsers -ProxySbc $null

Create PSTN usage
Set-CsOnlinePstnUsage -Usage "PuneLBRUsage"

Create Voice Route & Voice Routing Policy
New-CsOnlineVoiceRoute -Identity "LBR_VRP_Pune" -NumberPattern "\d+" -OnlinePstnGatewayList  sbc.cloud.com -Priority 1 -OnlinePstnUsages "PuneLBRUsage"

New-CsOnlineVoiceRoutingPolicy -Identity "Pune_LBR_VRP" -Description "Pune voice routing policy" -OnlinePstnUsages "PuneLBRUsage"

Create Calling policy with enablement of Prevent toll bypass:
New-CsTeamsCallingPolicy -Identity NO-InternationalTollBypass -PreventTollBypass $True

Apply the policy to the user on LBR site:
Grant-CsTeamsCallingPolicy –PolicyName "NO-InternationalTollBypass" -id "TestUser"

Assign VRP to the user 
Grant-CsOnlineVoiceRoutingPolicy -Identity kumar@cloud.com -PolicyName "Pune_LBR_VRP"

Once LBR is configured that means media traffic will still flow through Microsoft cloud but it will passback the traffic to local site SBC. Traffic originate from Teams client, it will go to Microsoft cloud, Microsoft cloud Media processor will route the traffic back to local SBC and from local SBC it will route to External PSTN network. In case we want the traffic to go directly to SBC from Teams client then enable Media bypass/LMO.

Location Based Routing
  1. User tried to call a International PSTN number from India (Pune). HTTP-Rest API signaling call is sent to O365 Teams infra.
  2. O365 Teams responded to signaling call with required information.
  3. Along with Signaling, CC components will respond back stating user is configured for Non-toll-bypass. It will validate user Trusted IP address. Checked for user LIS information.
  4. Next it checked if there is any SBC configured with LBR enabled settings.
  5. SBC routed the traffic to the PSTN infra.
  6. PSTN infra routed call to the destination number.

Posted in MS Teams | 4 Comments

Troubleshooting MS Teams

Generate logs in MS Teams:

Open MS Teams, then Press Ctrl + Alt + Shift + 1

This will generate logs in Downloaded folder of your Windows PC. Folder will be generated with timestamp and it will contain 3 folders.

Posted in MS Teams | Leave a comment

E911 Dynamic Emergency calling in Microsoft Teams

Dynamic emergency calling is a mechanism to notify emergency help services during an emergency scenario & this will be based on the location of the Teams Client. This will work with Microsoft Calling plan, Operator connect & Direct Routing.

The service will work with the help of Location information service. The Location Information Service (LIS) delivers geodetic OR civic address location information. The LIS is used by emergency calling service to make location-based call routing decisions and to properly locate callers.

2 new FCC regulations require dynamic E911 starting in 2021 and 2022

•Kari’s Law: Users cannot be required to dial an external access code for emergency calls. For example, you cannot require someone dial 9-911, they must be able to dial 911. Calls to the PSAP must also have also have a valid callback number.

•Ray Baum’s Act : Emergency calls must be capable of providing centralized notification and dynamic enhanced location must be used if technically feasible

Below are the main components of E911 calling in Teams.

Fig: Logical Blocks

Let’s follow the above diagram and configure all the above blocks step by step:

1st block on above diagram is to configure Trusted IP’s address. This is internet facing IP address for Teams client. Trusted IP address is very important. If this check is not passed then it won’t proceed to next steps.

New-CsTenantTrustedIPAddress -IPAddress 20.50.100.1 -MaskBits 32 -Description "Ext-IP"

Once Trusted IP is added then try making a test call and look into the Teams logs. You should see below entry onto the logs.

Under trustedIpMatchInfo you should be able to see reason: Matched. If you are seeing NotMatched, that means network location information in the X-Ms-UserLocation header is specified as external & expected value is internal, this means that the public IP address of the Teams client doesn’t match any entry in the list of trusted IP addresses.

Perfect, Lets go the 2nd block on Logical diagram & configure Emergency address location & LIS.

  1. Login to Microsoft Teams admin center, click Locations Emergency addresses.
  2. Click Add. Specify name and description for the location.
  3. Select the country or region, and then enter the address. Address set up in the emergency location, which is used to acquire the number, must match the phone number’s area code.
  4. In case address is not found then you can also add the address manually, turn on Edit the address manually.
  5. Click Save.

Once New Emergency address location is added. Edit it to add the LIS information. You will see below option. Add subnet, WAP, switches and ports details as per your requirement.

Great going !!! Let’s move to the 3rd block of Logical diagram. Emergency Policies and Emergency call routing policies.

  1. Login to Microsoft Teams admin center Voice > Emergency policies, and then click the Calling policies tab.
  2. Click Add. Enter a name for the new policy. You can enable External location lookup mode to allow your end users to configure their emergency address when they are not in the corporate network Or working from home.
  3. Ok now there is a setting which will fullfill Ray Baum’s Act. You need to notify people in your organization, typically the security desk, when an emergency call is made. To do this, under Notification mode, select one of the following:
    • Send notification only: A Teams chat message is sent to the users and groups that you specify.
    • Conferenced in muted and unable to unmute: A Teams chat message is sent to the users and groups that you specify and they can listen (but not participate) in the conversation between the caller and the PSAP operator.
    • Conferenced in muted but are able to unmute: A Teams chat message is sent to the users and groups that you specify and they can unmute to listen and participate in the conversation between the caller and the PSAP operator.
  4. Search for and select one or more users or groups, such as your organization’s security desk, to notify when an emergency call is made. The notification can be sent to email addresses of users, distribution groups, and security groups. A maximum of 50 users can be notified.
  5. Click Apply.

Next comes the Emergency call routing policies. This is basically used only with Direct routing configuration. Here you will set up emergency numbers and specify how emergency calls are routed. You can see below, number mapping along with PSTN usage which tell SBC/PSTN gateway emergency call will use.

Ok here comes the config for the 4th & last block mentioned above in Logical diagram.

Network Sites, this will include Region, Subnet, Emergency calling & Emergency call routing policy. Very important : Note that the subnet specified under Network Sites had nothing to do with subnet defined as a part of LIS in previous steps. This subnet settings will be used to assign Emergency calling policy. Now tricky part here is we have provision to assign Emergency calling policy at user level. So just be aware that this setting will take precedence over user policy settings.

CALL FLOW:
User called 911
User Teams public IP address is checked against Trusted IP address list onto the Tenant.
If public IP matches one of the Trusted IP address then goto next step Or If NotMatched then drop the call.
User LIS will collected (Subnet,WAP,Switch & Port etc…)
User assigned Emergency calling policy is checked.
Someone from the org. will be notified as per Emergency calling policy config.

Posted in MS Teams | 1 Comment

M365 Licensing using msol and AzureAD powershell

M365 licensing can be tricky sometime. Below cmdlt flow will help you sort out your tenant licensing information properly.

PS C:\> Install-Module AzureAD
PS C:\> Connect-AzureAD
PS C:\> Install-Module MSOnline
PS C:\> Connect-MSolservice

Next lets get the list of all the purchased license, consumed unit and available units.

PS C:\> Get-AzureADSubscribedSku | Select -Property SkuPartNumber, ConsumedUnits -ExpandProperty PrepaidUnits | Format-Table

We can see from above skuPartNumber represent the type of license. We have 69 “ENTERPRISEPACK” licenses in this tenant. The SkuPartNumber for each does not precisely match the name of the license that we will see in Microsoft 365 admin portal e.g. ENTERPRISEPACK is the SkuPartNumber for the office 365 E3, while MCOEV is the SkuPartNumber for the Phone system license.

Ok so next comes ServicePlanName , these are plans under SkuPartNumber . These are individual license features and services also referred to as sub-SKU features, can also be inspected. As with the SkuPartNumber values, the ServicePlanName values are not a match for the friendly names that you see in the Microsoft 365 or Azure admin portals.

PS C:\> $license=Get-AzureADSubscribedSku
PS C:\> $licenses[3].SkuPartNumber 
ENTERPRISEPACK
PS C:\> $licenses[3].Serviceplans

Ok, so now we know about license bought/allocated. Next part comes to user side, what license are assigned to the user, Or who all users are assigned with a particular license.

So lets check what all licenses are assigned to a user.

PS C:\> Get-msoluser -SearchString user@cloudmechanics.in| ft UserPrincipalName, @{L='Licenses Assigned'; E={($_.licenses).Accountskuid}}

Ok lets dig further and see what are service plan assigned to the user.

PS C:\> (Get-AzureADUser -objectid user@cloudmechanics.in | Select-Object AssignedPlans).AssignedPlans

Next, lets get the list of all the users assigned with one particular license type, here we will get all the users list who are assigned with “ENTERPRISEPACK”, i.e. O365 Enterprise E3:

PS C:\> Get-MsolUser -All | Where-Object {($_.licenses).AccountSkuId -match "ENTERPRISEPACK"}

Ok Next, steps let get the list of all the users assigned with a particular service plan inside License plan

PS C:\> Get-MsolUser | ? {$_.Licenses.ServiceStatus | ? {$_.ServicePlan.ServiceName -eq "TEAMS1" -and $_.ProvisioningStatus -eq "Success"}}

Complete list of friendly name can be fetched from below link:

https://docs.microsoft.com/en-us/azure/active-directory/users-groups-roles/licensing-service-plan-reference

Posted in Azure, Powershell | Leave a comment

Script to get MS Team user information

You will come across requirement where you need to fetch users MS Teams related information e.g. you are going to enable voice services for the users, so you need to get the required information whether user have required license, usage location, TeamsUpgradeEffectiveMode etc.. So I have written script to get all these MS Teams user related information.

Save the below file as .ps1. Run the script. It will ask for input file. Please specify input file that contain userprincipalname. Once script complete it will create output csv file with domainname of one of the userprincipal name. Output file will named as domainname+Current date and time.csv.

<# 
Header of the input file would contain only one column with name as userprincipalname
connect to both teams and msolservice
connect-microsoftteams
connect-msolservice
 #>

$users = $null
$source = $null
$destination = $null
$error.clear()
$Results = @()

while ($source -eq $null){
$source = read-host "Enter source file name"
if (-not(test-path $source)){
    Write-host "Invalid file path, re-enter."
    $source = $null
    }
if ((get-item $source).psiscontainer){
    Write-host "Source must be a file, re-enter."
    $source = $null
    }
elseif($source -notmatch "(\.csv)"){
	Write-host "The file must be a .csv"
	$source = $null
	}
}

$users = import-csv $source
#$users = get-csonlineuser   <# Uncomment this line and comment above line if you want report for all Csonline users.

$domain=$users[0].userprincipalname <#fetch the first vaule of userprincipalname column#>
$Before = $domain.Split("@")[1]      # This will remove everything before @ from $domain variable value
$destination=$before+(Get-Date -Format "dd-MM-yyyy__HH_mm_ss")+".csv"   # This will generate destination file name with current date and time.#>

$count = $users.count
write-host "Processing " $count "Users...Please wait..." -foregroundcolor Yellow -backgroundcolor Black


ForEach ($user in $users) {

 	Write-host "Processing user " -NoNewline
	Write-host $user.userprincipalname -BackgroundColor Red 

	Try{
				
	  $csonlineusers=get-csonlineuser -identity $user.userprincipalname 
	  $msolusers= Get-MsolUser -SearchString $user.userprincipalname
      
      $Properties = @{
      Name = $csonlineusers.DisplayName
      userprincipalname = $csonlineusers.UserPrincipalName
      UsageLocation = $msolusers.usagelocation
      License = $msolusers.Licenses
      HostingProvider = $csonlineusers.HostingProvider
      SipAddress = $csonlineusers.SipAddress
      EnterpriseVoiceEnabled = $csonlineusers.EnterpriseVoiceEnabled
      country = $csonlineusers.country
      LineURI = $csonlineusers.LineURI
      HostedVoiceMail = $csonlineusers.HostedVoiceMail
      OnlineVoiceRoutingPolicy = $csonlineusers.OnlineVoiceRoutingPolicy
      TeamsCallingPolicy = $csonlineusers.TeamsCallingPolicy
      TenantDialPlan = $csonlineusers.TenantDialPlan
      TeamsUpgradeEffectiveMode = $csonlineusers.TeamsUpgradeEffectiveMode 
      TeamsUpgradePolicy = $csonlineusers.TeamsUpgradePolicy 
      CallingLineIdentity = $csonlineusers.CallingLineIdentity
      TeamsIpPhonePolicy = $csonlineusers.TeamsIpPhonePolicy
      TeamsCarrierEmergencyCallRoutingPolicy = $csonlineusers.TeamsCarrierEmergencyCallRoutingPolicy
      AssignedPlans = $csonlineusers.AssignedPlan -join ','
      }
		
$Results += New-Object psobject -Property $properties

$Results | Select-Object Name,userprincipalname,UsageLocation,License,AssignedPlans,HostingProvider,OnPremHostingProvider, SipAddress, EnterpriseVoiceEnabled, country, LineURI, HostedVoiceMail, OnlineVoiceRoutingPolicy, TeamsCallingPolicy, TenantDialPlan, TeamsUpgradeEffectiveMode, TeamsUpgradePolicy, CallingLineIdentity, TeamsIpPhonePolicy, TeamsCarrierEmergencyCallRoutingPolicy | Export-Csv -notypeinformation -Path $destination

		}
	Catch{
	$user.userprincipalname  | Out-File C:\scripts\ProvisioningErrors.log -Append
	$_.Exception | Out-File C:\scripts\ProvisioningErrors.log -Append
	}
	
}

start $destination

write-host "there where " + $error.Count + "errors in this batch"
$error.clear()

sample input file:

Posted in MS Teams, Powershell | Leave a comment

MS Teams Auto-Attendant call forwarding to External PSTN number with Direct Routing

We have a situation where MS Teams auto attendant call need to be get forwarded to external PSTN numbers. As we know Auto-attendant make use of number assigned to resource account. So basically when we are configuring forwarding in Auto Attendant settings. Additionally we need to set the OnlineVoiceRouting policy to the Resource account (Using PowerShell). Below is the code cmdlts you can use to set onlineVoicerouting policy to a resource account.

#MS Teams is using Direct Routing for PSTN calls
#Configure resource account for outbound call in MS Teams Auto Attendants
 
#Connect to Microsoft Teams via PowerShell
Connect-MicrosoftTeams
 
#Get all the Online Voice Routing Policies
Get-CsOnlineVoiceRoutingPolicy
 
#Assign Online Voice Routing Policy to Microsoft Teams Resource Account for Teams Direct Routing

 
Grant-CsOnlineVoiceRoutingPolicy -Identity ResourceAccount@cloudmechanics.in -PolicyName Test_Voice_Routing_policy

 
Get-CsOnlineUser ResourceAccount@cloudmechanics.in | select UserPrincipalName,OnlineVoiceRoutingPolicy
 
# Perfect Job Done, disconnect from MS Teams
 
#Disconnect
Disconnect-MicrosoftTeams

So after running above cmdlts, try calling Auto-Attendant number and it will get routed to the external number set up in Auto Attendant configuration.

Posted in MS Teams, Powershell | Leave a comment

Caller ID policies to mask user number with Resource account number in MS Teams

Masking caller id is one among the standard phone system feature. When MS Teams user call someone on PSTN number, organization want to show the the common phone number e.g. call from reception should show reception desk number instead of user personal number. When browse & navigate to the Caller ID Policy from Teams admin portal, we don’t have option to select a Resource Account number. We have to make use of Teams PowerShell to assign resource account to caller ID policy then to the user.

  • Create Calling Line Identity or Caller ID policy.
New-CsCallingLineIdentity  -Identity OutboundfromReception -Description "Reception Mask"
  • Get the Resource account details and store it onto a variable. Then assign the resource account to to newly created caller ID policy.
$ResourceAccount = Get-CsOnlineApplicationInstance -Identity Res-account@cloudmechanics.in

Set-CsCallingLineIdentity -Identity OutboundfromReception -CallingIDSubstitute resource -ResourceAccount $ResourceAccount.ObjectId
  • Last stage is apply the caller ID policy to the user.
Grant-CsCallingLineIdentity -Identity "user@cloudmechanics.in" -PolicyName "OutboundfromReception"
Posted in MS Teams, Powershell | Leave a comment

Connect various M365 services from VScode

Install PowerShell extension in VSCode

Connect to MS Teams from VSCode:

# Open Vscode with admin rights
# In the PowerShell Window, run the following PowerShell commands using Office 365 Admin account credentials: 

Install-Module -Name MicrosoftTeams -Force -AllowClobber
Import-Module -Name MicrosoftTeams 
Connect-MicrosoftTeams
Disconnect-MicrosoftTeams

Connect to Exchange online from VSCode:

# Check the supported version 5.1 and above using below cmdlt

$PSVersionTable 

# Set execution policy to remote signed

Set-ExecutionPolicy RemoteSigned
[Net.ServicePointManager]::SecurityProtocol = [Net.ServicePointManager]::SecurityProtocol -bor [Net.SecurityProtocolType]::Tls12
Install-PackageProvider -Name NuGet -Force
Install-Module PowerShellGet -AllowClobber -Force
Set-PSRepository -Name PSGallery -InstallationPolicy Trusted

# Close PowerShell/Vscode and open again:

Install-Module -Name ExchangeOnlineManagement
Import-Module ExchangeOnlineManagement; Get-Module ExchangeOnlineManagement
Connect-ExchangeOnline -UserPrincipalName admin@cloudmechanics.in

Connect to AzureAD from VSCode:

Install-Module -Name Az -Scope CurrentUser -Repository PSGallery -Force
Install-Module -Name PowerShellGet -Force
Install-Module -Name AzureAD
Import-Module  AzureAD
Connect-AzureAD

Connect to Azure from VSCode:

Az login
Posted in Powershell | Leave a comment

Script to connect MS Teams

Sometime you may want to avoid entering user-name and password every time. Below is the small script you can use it to connect to MS Teams. Last line of the below code is just to change the PowerShell title. This will helpful in case you are connecting multiple environment. It will be easy to identify which PowerShell window belongs to which tenant. Title will be set temporarily, when we close the console and open it again, the title will be set to the default.

#Specify UserName and Password
$UserName = "Admin@cloudmechanics.in"
$PassWord = ConvertTo-SecureString -String "Password" -AsPlainText -Force
 
#Create a Credential object
$Cred = New-Object -TypeName "System.Management.Automation.PSCredential" -ArgumentList $UserName, $PassWord
 
#Connect to Microsoft Teams with specified credentials

Connect-MicrosoftTeams -Credential $Cred

# Below cmdlts will add Cloud-Mechanics to PowerShell Title
$host.UI.RawUI.WindowTitle = "Cloud-Mechanics"
Posted in MS Teams, Powershell | 2 Comments

Exchange PowerShell script to convert DL to contact

Recently I have came across a requirement where customer want to remove few of the DL but they want to keep the email-id mapped to a new contact. All the existing attribute should be stamped to the new contact. LegacyDN from DL should be stamped as X500 address onto the newly created contact. So that if someone send email to removed DL it should get forwarded to an external contact. Below is the script I wrote to convert the DL to a mail contact.

# Save the script as distributiongroupToContact.ps1 and run below cmdlt. Please do specify 
# the ExternalEmailAddress in the cmdlt as shown below.

# Usage: .\distributiongroupToContact.ps1 -Identity testdl -ExternalEmailAddress   
testdl@cloudmechanics.onmicrosoft.com -Confirm:$false


[CmdletBinding(
SupportsShouldProcess=$true,
ConfirmImpact="High"
)]
Param
(
[Parameter(Mandatory=$true,Position=0)]
[String]$Identity,
[Parameter(Mandatory=$true,Position=1)]
[String]$ExternalEmailAddress,
[Parameter(Mandatory=$false,Position=2)]
[String]$DomainController
)
PROCESS
{$parameters = @{}
if( $DomainController ) {
    $parameters.Add( 'DomainController', $DomainController )
    Write-Verbose ( 'Using Domain Controller "{0}"' -f $DomainController )
}

Write-Verbose ( 'Trying to find Distribution group for "{0}"' -f $Identity )
$Distributiongroup = get-distributiongroup $Identity @parameters -ErrorAction SilentlyContinue

if( ($Distributiongroup) -and -not ($Distributiongroup.count -gt 1) ) {
    if( $pscmdlet.ShouldProcess($Distributiongroup.DistinguishedName) ) {
        $parameters.add( 'Identity', $Distributiongroup.DistinguishedName )

        Write-Verbose ( 'Removing DL"{0}"' -f $Distributiongroup.DistinguishedName )
        remove-distributiongroup @parameters -confirm:$false -BypassSecurityGroupManagerCheck

        $parameters.add( 'ExternalEmailAddress', $ExternalEmailAddress )

        Write-Verbose ( 'Enabling mailuser "{0}"' -f $Distributiongroup.DistinguishedName )
        new-mailcontact $Distributiongroup.name -OrganizationalUnit $distributiongroup.OrganizationalUnit -ExternalEmailAddress $ExternalEmailAddress

        $parameters.add( 'EmailAddressPolicyEnabled', $Distributiongroup.EmailAddressPolicyEnabled )

        $EmailAddresses= @( 'x500:{0}' -f $Distributiongroup.legacyExchangeDN )

        if( $Distributiongroup.EmailAddressPolicyEnabled ) {
            foreach( $EmailAddress in $Distributiongroup.EmailAddresses ) {
                if( $EmailAddress -like 'smtp:*' ) {
                    $EmailAddresses += $EmailAddress.ToString().ToLower()
                } else {
                    $EmailAddresses += $EmailAddress.ToString()
                }
            }

            $parameters.add( 'EmailAddresses', @{Add=$EmailAddresses} )
        } else {
            foreach( $EmailAddress in $Distributiongroup.EmailAddresses ) {
                $EmailAddresses += $EmailAddress.ToString()
            }


            if( $Distributiongroup.EmailAddressPolicyEnabled ) {
            foreach( $EmailAddress in $Distributiongroup.EmailAddresses ) {
                if( $EmailAddress -like 'X500:*' ) {
                    $EmailAddresses += $EmailAddress.ToString().ToLower()
                } else {
                    $EmailAddresses += $EmailAddress.ToString()
                }
            }

            $parameters.add( 'EmailAddresses', @{Add=$EmailAddresses} )
        }


            $parameters.add( 'EmailAddresses', $EmailAddresses )
        }

        $parameters.add( 'DisplayName', $Distributiongroup.DisplayName )
        $parameters.add( 'Alias', $Distributiongroup.Alias )
        $parameters.add( 'CustomAttribute1', $Distributiongroup.CustomAttribute1 )
        $parameters.add( 'CustomAttribute2', $Distributiongroup.CustomAttribute2 )
        $parameters.add( 'CustomAttribute3', $Distributiongroup.CustomAttribute3 )
        $parameters.add( 'CustomAttribute4', $Distributiongroup.CustomAttribute4 )
        $parameters.add( 'CustomAttribute5', $Distributiongroup.CustomAttribute5 )
        $parameters.add( 'CustomAttribute6', $Distributiongroup.CustomAttribute6 )
        $parameters.add( 'CustomAttribute7', $Distributiongroup.CustomAttribute7 )
        $parameters.add( 'CustomAttribute8', $Distributiongroup.CustomAttribute8 )
        $parameters.add( 'CustomAttribute9', $Distributiongroup.CustomAttribute9 )
        $parameters.add( 'CustomAttribute10', $Distributiongroup.CustomAttribute10 )
        $parameters.add( 'CustomAttribute11', $Distributiongroup.CustomAttribute11 )
        $parameters.add( 'CustomAttribute12', $Distributiongroup.CustomAttribute12 )
        $parameters.add( 'CustomAttribute13', $Distributiongroup.CustomAttribute13 )
        $parameters.add( 'CustomAttribute14', $Distributiongroup.CustomAttribute14 )
        $parameters.add( 'CustomAttribute15', $Distributiongroup.CustomAttribute15 )
        $parameters.add( 'ExtensionCustomAttribute1', $Distributiongroup.ExtensionCustomAttribute1 )
        $parameters.add( 'ExtensionCustomAttribute2', $Distributiongroup.ExtensionCustomAttribute2 )
        $parameters.add( 'ExtensionCustomAttribute3', $Distributiongroup.ExtensionCustomAttribute3 )
        $parameters.add( 'ExtensionCustomAttribute4', $Distributiongroup.ExtensionCustomAttribute4 )
        $parameters.add( 'ExtensionCustomAttribute5', $Distributiongroup.ExtensionCustomAttribute5 )

        Write-Verbose ( 'Updating Mailcontact "{0}"' -f $Distributiongroup.DistinguishedName )
        set-mailcontact @parameters
    }
} elseif( $Distributiongroup.Count -gt 1 ) {
    Write-Host ( 'Multiple DL found for "{0}"' -f $Identity ) -ForegroundColor Red
} else {
    Write-Host ( 'Unable to find DL for "{0}"' -f $Identity ) -ForegroundColor Red
}
}

Posted in Exchange Online, Powershell | Leave a comment

AAD Connect flow

Azure AD Connect allows you to sync your on-premises AD forest objects with Azure AD. This sync mainly include Active Directory user accounts & groups. In reverse with a very limited capability Azure AD can sync data back to the on-premises Active Directory e.g. password change update. It is moreover benefiting to achieve functionalities such as SSO, Multi-Factor Authentication (MFA), Conditional Access and many more.

Image: AAD connect replication flow
  • On-premise AD: Active directory or in-short AD is on-premises identity/authentication service. This is mainly based on NTLM and Kerberos protocols.
  • Azure AD : Microsoft cloud identity/authentication service. This is mainly based on OAuth and OpenIDConnect protocols.
  • AAD Connect: This is the engine to sync identities from On-premise AD to Azure AD.
  • AAD Connect engine consist of
    • Connector space
    • Metaverse
    • Connectors
    • Sync rules (Inbound & Outbound Rules)
    • Import and Export export operation via connector
Posted in Azure AD Connect | Leave a comment

MS Teams PSTN call flow with Direct Routing

Lets try to investigate what happens when user dials a PSTN number from their MS Teams client.

  1. User launched dial pad in MS Teams.
  2. User dialed a number +1-425-765-6xxx
  3. Check for the dial plan (policy) assigned to the user. If any custom dial plan assigned to the user then conversion will happen e.g. Extension number to full E.164 format conversion.
  4. Next it will check for the Voice routing policy assigned to the user.
  5. Under Voice routing policy it will check for the PSTN-usage.
  6. PSTN-usage contain all the available routes for that user. If one among the route matches the dailed number. Then call will be routed. Or else it will be dropped.
  7. We can have multiple routes under PSTN usage e.g. we can have one route for US number which points to a specific SBC and other route for Canada numbers which goes via other SBC.

    Ok, let’s see the configuration flow. Below is the order you will configure Direct routing.
  8. Configure SBC (PSTN gateway)—>Create Voice Route —>Add the previously configured SBC to the voice route—->Add this voice route to PSTN Usage—>Add PSTN usage to Voice routing policy or Calling policy—>Assign it to user.
Image Courtesy: Microsoft

Logical representation of connection between User, Voice routing policy, PSTN Usage & Voice routes

Posted in MS Teams | Leave a comment

Auto Attendant in MS Teams

  1. Create Resource account for call queue and auto attendant. Basically this is the account which will be mapped to call queue Or auto-attendant and a phone number will be assigned to these resource accounts.

    PS C:\>New-CsOnlineApplicationInstance -UserPrincipalName "RA_CQ@domain.com" -DisplayName "Test CQ" -ApplicationID "11cd3e2e-fccb-42ad-ad00-878b93575e07"
    PS C:\>New-CsOnlineApplicationInstance -UserPrincipalName "RA_AA@domain.com" -DisplayName "Test AA" -ApplicationID "ce933385-9390-45d1-9512-c8d228074e07"


  2. Assign Microsoft Team Phone Standard-Virtual user license to CQ or AA Resource accounts. In case you don’t want Call queues to receive call directly then assign the license only to Auto attendant Resource account.

    PS C:\>Set-MsolUser -UserPrincipalName RA_CQ@domain.com -UsageLocation US
    PS C:\>Set-MsolUser -UserPrincipalName RA_AA@domain.com -UsageLocation US


    PS C:\>Set-MsolUserLicense -UserPrincipalName RA_CQ@domain.com -AddLicenses "CloudMechanics:PHONESYSTEM_VIRTUALUSER"
    PS C:\>Set-MsolUserLicense -UserPrincipalName RA_AA@domain.com -AddLicenses "CloudMechanics:PHONESYSTEM_VIRTUALUSER"


  3. Create call queue and add CQ Resource account to the CQ.
  4. Create Auto attendant and add AA resource account to the AA.
  5. Assign call queue to auto-attendant as voice app.
  6. Once License is assigned then we can assign the number to Resource account.
Sample Auto-Attendant flow (Image Courtesy: Microsoft)
Posted in MS Teams | Leave a comment

Handy Cmdlts in Microsoft Teams

Often we come across of scenario where we need small onliner cmdlts to get information quickly. Below are few such onliner.

Get the details of  all MS Teams users and value stamped to these user properties.

PS C:\> get-csonlineuser | select-object UserPrincipalName,UsageLocation,TeamsUpgradeEffectiveMode,TeamsUpgradePolicy,TeamsCallingPolicy,OnlineVoiceRoutingPolicy,HostingProvider,DialPlan,LineUri,AssignedPlan | Export-Csv -NoTypeInformation -Path C:\scripts\output.csv

Import users from CSV file and get their report. Export results into CSV file. Just make sure the inupt file contains header as Displayname.

PS C:\> import-csv c:\scripts\Input.csv | foreach{get-csonlineuser $_.Displayname} | UserPrincipalName,UsageLocation,TeamsUpgradeEffectiveMode,TeamsUpgradePolicy,TeamsCallingPolicy,OnlineVoiceRoutingPolicy,HostingProvider,DialPlan,LineUri,AssignedPlan | Export-Csv -NoTypeInformation -Path C:\scripts\output.csv

Get the phone number and its corresponding type

PS C:\> import-csv c:\scripts\Input.csv | foreach{Get-CsPhoneNumberAssignment -TelephoneNumber $_.phonenumbertype} | Select-Object Telephonenumber,PstnAssignmentStatus,Numbertype

List of users based on Usage Location filter as US :

Get-CsOnlineUser -Filter {UsageLocation -eq "US"} | Select-Object DisplayName,UsageLocation,UserPrincipalName,LineUri | Export-Csv -NoTypeInformation -Path C:\scripts\output.csv

Get user list based on specified filter (where OR filter condition)

PS C:\> Get-CsOnlineUser | Where{$_.userprincipalname -like "*mar*"} |ft Alias
PS C:\> Get-CsOnlineUser -Filter {Tenantdialplan -like "test*"} | ft userprincipalname
Posted in Powershell | Leave a comment

Azure Terrafy

Infrastructure as code (Iac) is a perfect way to automate your deployment. But sometime it’s difficult to find a point where to start. So here comes Azure Terrafy for rescue. It is an open-source tool that allows you to quickly import your existing Azure infrastructure into Terraform HCL and import it into Terraform state. Below are the steps to use this tool. Just make sure you have Azure CLI installed.

  1. Install Azure Terrafy from go toolchain. Run below cmdlt to install.
    • go install github.com/Azure/aztfy@latest
  2. Once aztfy is installed successfully.
  3. Time to test the newly installed tool. Pick any of the resource group from your Azure infrastructure and run below command.
    • aztfy <Resource-group name>
  4. In our case we are using Resource group named as Win10.

5. Just wait for a while and you will see below output. It will start gathering information about current resources under specified Resource group.

6. Hit w onto the keyboard and you will see import process will start.

7. Wait for a while and you will see the specified resource group is imported into current directory.

8. Go to the folder and open the file and you will complete Terraform files being generated. In our case it’s c:\aztfy

So you can see above how easy it is now to import your existing infrastructure into code.

Happy Learning !!

Posted in Azure | Leave a comment

Configure Operator Connect in MS Teams

Operator connect provide a way to enhance your Teams calling experience. With the help of operator connect you can call any mobile, landline or PSTN number directly from your Teams app.

  • To configure Operator connect you need to have required license in place. Below is the list of pre-requisite you need to have in place before you start configuring Operator connect.
  1. You need to have Microsoft/O365 Enterprise licenses E3+Phone System or E5.
  2. In case you are planning to use Call queues & Auto-attendant then you need to have Phones System – Virtual User license. It’s a free license and you don’t need to pay for it. Just ask Microsoft to allocate few of these license to you.
  3. You should have at least one physical address available from country/location where you are planning to assign the numbers to your users.
  • Once you have all the pre-requisite ready. Proceed with configuration of Operator connect.
  • Login to Microsoft Teams Admin Center, go to Voice menu, click on Operator connect, select ‘your preferred operator’ from the list and select the country to receive phone numbers.

  • Once you select a carrier from the list you will see below screen. Select the country from the list where you want to have user to make phone call from MS teams. Provide necessary information such as Company size. Enter Full name /Email and Phone number. Check the box ‘Operator can contact me’ . This will help your operator to connect with you for next steps.
  • Next select the check box “I accept the data transfer notice”. Once you select the checkbox a small pop up window will open. Click on Agree this data transfer notice.
  • Once you accept the notice. In section ‘My Operators’, you will be able to see your activated operators. Wait to hear back from your preferred operator. Once they confirm the number allocation to you, then you can come back to MS Teams and under Voice–>Phone numbers you should be able to phone number in unassigned state.
  • Next proceed with number assignment to the end users. Below cmdlts can be used to assign the number and calling policy to the end users.

Set-CsPhoneNumberAssignment -Identity test@cloudmechanics.in -PhoneNumber +918776567XXX -PhoneNumberType OperatorConnect

Set-CsPhoneNumberAssignment -Identity test@cloudmechanics.in -EnterpriseVoiceEnabled $true

Grant-CsTeamsCallingPolicy -Identity test@cloudmechanics.in -PolicyName AllowCalling

Grant-CsTeamsUpgradePolicy -PolicyName UpgradeToTeams -Identity test@cloudmechanics.in


Posted in MS Teams | Leave a comment

Call Routing Method in MS Teams Call queues

Call Routing Method is an important aspect while we configure Call queues in MS teams. Its important to understand so that agent doesn’t gets overloaded and shares equal loads of incoming calls. In MS teams we have 4 type of Routing method in call queues.

  1. Attendant routing will ring all the agent at same time. The agent who picks up the call first will get the call and it will stop ringing for rest all other agents.
  2. Serial routing as the name specify it will ring all the agents one by one. If first agent is not responding then it will go to the next. This process will repeat until call is picked or it times out.
  3. Round robin will distribute the calls equally. Classical sales representative scenario follow this approach. So that each sales executive get opportunity to sell their product.
  4. Longest idle is where call will be routed based on agent MS Teams status. Longer the agent is in available status means longer he is idle. If the agent presence is set anything other than available then calls won’t be routed to the agent.
Posted in MS Teams | Leave a comment

Use PowerShell ISE in VSCode

  1. Install PowerShell extension onto the VSCode.

2. Open command palette onto the Vscode using Ctrl+Shift+P and search for ISE. You should be able to see below options. Just select PowerShell: Enable ISE Mode.

3. Once you select the mode, you should see your favourite PowerShell ISE mode is available in VSCode. You can see on below image that all cmdlts are available on left hand side. Intellisense is working ono the middle pane. You can write your scripts and execute it directly from VSCode.

Posted in Powershell | 2 Comments

Create call queues in MS Teams

  • Create resource account from MS Teams Admin center.
  • Select the resource account type to Call queue.
  • Assign free license to resource account. Microsoft Team Phone system-Virtual User
  • License assignment need to done from Microsoft 365 admin center.
Posted in MS Teams | Leave a comment